Hot Press News
- Baker Law Group Expands Estate Planning and Probate Services to Northglenn Community
- As Hurricane Season Intensifies, Altitude Water Expands Global Relief Efforts with Life-Saving Sponsorship Program
- Logans Fashions Celebrates Expansion with Exclusive Naya Clothing Collection
- Zuari Industries Limited has delivered a strong performance in Q1 FY26, achieving a consolidated revenue of ₹267.6 crore
- Zehntech Expands Odoo ERP Capabilities to Empower Businesses with Tailored Digital Transformation
- Sterling Next Launches ITIL V4 Foundation Certification Training to Elevate IT Service Management Careers
- Chetu Named a Finalist in CRN’s Best AI Solution Provider Category
- Lakmē Academy Powered by Aptech is now the Official Beauty Education Partner of Miss Universe India 2025
- FavePlaza.in Brings Affordable, Trendy, and Size-Inclusive Fashion to Every Indian Household
- SANY India Marks Independence Day with the Launch of New SY35U PRO Excavator
- Yashuka Machinery Expands Excellence in Plastic Injection Molding with Advanced Auxiliary Equipment
- India-UK Technology Security Initiative Expands with £1.8 Million Boost as TEXMiN to Host Satellite Campus at IIT (ISM) Dhanbad
- Sigzen Technologies Launches Innovative WhatsApp CRM Integration for ERP Solutions
- CommLab India and Lancaster University Launch Global Study on AI in Workplace Learning
- MSTV Launches New Legal Series VIDHI-ALAYA Showcasing Inspiring Law Personalities
 Mail to a Friend Mail to a Friend |
|
 |
How accountancies can automate client reporting from QuickBooks Online using Power BI
2025-08-14 04:47:03
Business
519
How accountancies can automate client reporting from QuickBooks
Online using Power BI

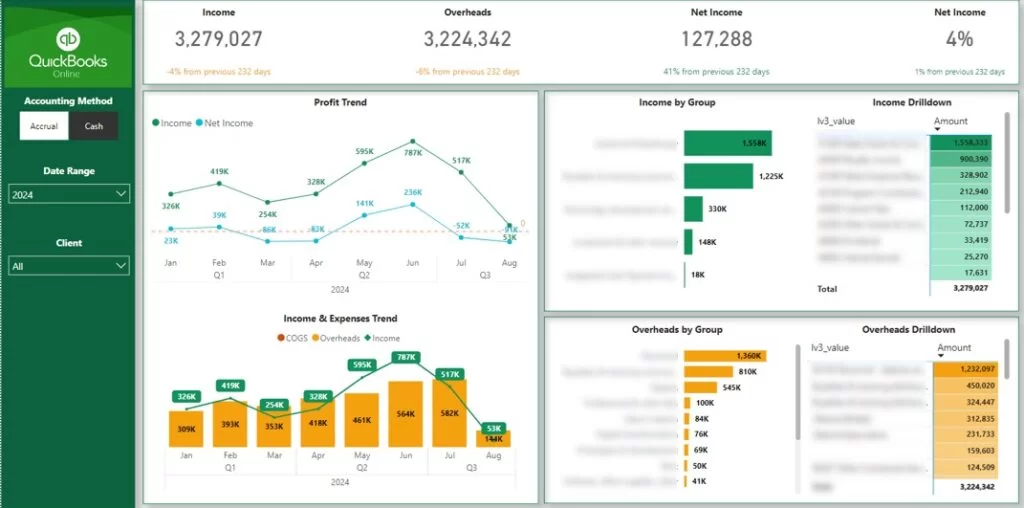
Power BI QuickBooks Online Dashboard
For
many businesses, QuickBooks Online (QBO) serves as the go-to platform for bookkeeping and accounting. Intuit has thousands of
accounting partners around the world all specializing in using QuickBooks
Online for their clients.
Many accountancies and fractional CFO
produce monthly financial analytics reportsto update on the financial
health of client’s business. This process is easy to manage when you have a
couple of clients but many have dozens!
There are a lot of manual steps involved in this process including:
-
Exporting data manually
to Excel
-
Transforming the data to
a convenient format
-
Copying and pasting the
data
-
Dragging the Excel
formulas down
This
process takes between 30-60 minutes per client per month and is prone to errors
due to all the manual data manipulations. In this article we want to
demonstrate a more scalable and fully automated reporting process on QuickBooks
Online data using Power BI.
Let’s
get into it!
What is Power BI
Power BI is a data analytics software in the business intelligence consulting space that was built from 2 Excel add-ins: Power Query and Power Pivot. It is safe to say that Excel evolved into Power BI.
Like Excel, Power BI provides an interface where users can create graphs, tables and management reports. Unlike Excel, it offers native integrations with 250+ data sources including QuickBooks Online.
These integrations enable users to extract the data from their data sources, automate data transformation steps and schedule data refresh.
Let us demonstrate how this it done
Connecting QuickBooks Online with Power BI
There’s a by-default QuickBooks Online connector
available in Power BI. This is a really good option if you want to pull data
from a single QuickBooks Online account. In order to use QuickBooks Online
connector, below are the steps to set it up.
Go to “Get Data” and search for “QuickBooks Online”.

Once you type “QuickBooks”, Power BI will show the
relevant connector to you. Select it and then click “Connect”.
2. Once you click connect, the system will prompt you
with a warning message. Click continue to navigate to
the next screen.

3. Once you accept the warning message, you will be
prompted to the authentication window. When you click on “Sign in”, the
authentication process will begin.

4. Enter your username and password. Once done, the
authentication process will be completed!

5. Select the tables that you want to load! As you can
see, there are 113 available tables inside of this connector.

This connector is great if you want to automate
QuickBooks Online reporting for a single client. Sadly it does not allow to extract the data from multiple QuickBooks Online
accounts. We will show you how to overcome this limitation later in the
article.
The native connector is also great for simple
reporting like analysing the invoice activity and bills. However, if you want
to visualise your P&L or Balance Sheet statements, you would need to
combine multiple tables together which is not easy. Again, we will show you how
to work around this hurdle later in this article.
Custom Power BI QuickBooks Online Connector
The native Power BI QuickBooks Online connector
definitely moves us towards our goal of automated reporting. However, we can
take automation one step further by relying on the Power BI QuickBooks Online connector from Vidi
Corp. This connector has a free trial that does not require you to add any
payment details.
This connector is capable of extracting data from
QuickBooks Online into an Azure SQL server database. This approach has multiple
advantages:
- You can extract the data from multiple QuickBooks
Online accounts and which then can be merged together in a database
- The data is transformed to a more convenient format
before being returned to you
- The integration between Power BI and Azure SQL
Server is very stable since both are Microsoft products.
Here are the steps given below that you can follow for
installing this connector
1. Navigate to https://vidi-connectors.azurewebsites.net/ and register an account.
2. After you log in, go to the "Install"
tab. You can either enter your Azure SQL Server details or select "Vidi Database" as your preferred option. Clicking "Install"
will execute a script that creates the tables in your database. When you
connect your QuickBooks account, data will start automatically flowing into
these tables
3. It will then automatically redirect you to the next
menu for you to connect your QuickBooksOnline data to
the system. Once you click on the green button of “connect new company”, the
process will begin.

In the next step, you need to select the company that
you want to connect with. You can repeat this step if you need to connect
multiple companies.

After this it will automatically redirect you to the
same table as before. Your company name will appear in the table.

Use the "Refresh Status" tab to track
the progress of your data loading. When 100% data is loaded, it will be fully
ready for your use.
Once all historical QuickBooks Online data is loaded
to Azure SQL, the system will handle automatic table refreshes moving forward.
These refreshes can be scheduled based on customer preferences, with the
default interval set to every 30 minutes.

Once you go back to the install tab, it will be possible
for you to click the blue button to “Send database string” to your registered
email.

You will then receive an email similar to the one given
below. The details given in this email can be used for connecting Power BI to
your Azure SQL Server database.

The final step is to click “get data” in Power BI
again and select “Azure SQL database”

You will then need to input the server name and
database name from the email above. Click OK once you are done.

The next step is to enter the username and password
which again you will find in the email above. 
Finally, you can select the tables that you want to
load from the menu below.

Creating
Your First Power BI QuickBooks Online Dashboard
You can connect the data
from the Vidi Corp connector to a free dashboard
template. This template immediately visualises your P&L, Balance Sheet and
Cash Flow statements and combines multiple QuickBooks accounts together.
Let’s go through the steps
to install this template together!
1.
You will be able to download this template from
the same email that we looked at before. Simply click the “Get Power BI
QuickBooks Template” link in the email. This will download the template to your
computer.

Note: please ensure
that the Windows computer you are using has the Power BI Desktop installed onto
it. You can refer to this guide for installing the Power BI Desktop if needed.
Open Power BI
Desktop, and click file, import and “Power BI Template”

You will then
be able to view all the Power BI templates that are avaiable
for you.

Your Power BI
template will then be loaded into Power BI. Next, simply enter your server
name, database name, and schema. You can find these details in the same email you
saw above. Once entered, click "Load" to proceed
A new window will pop up multiple times, asking your confirmation that you want
to run the database queries that extract the data. Press “Run” for all of them.

Once the
queries conclude running, you will be able to find your data visualised in
Power BI.

Conclusion
We have explored 2 ways to automatically
extract data from QuickBooks Online to Power BI. Feel free to explore both of
these ways in more detail and seeing which one works for you!
Either way, we hope that this blog will save you and your team valuable time having to manually export the data from QuickBooks Online!